Strain Requirements
The following checklist can be used as a quick reference to ensure your strains meet our submission criteria.
Samples that do not meet one or more of the criteria below can be refused, or fail to sequence entirely, so please ensure you read the entire document to avoid any issues or delays.
Tubes: |
Receive tubes from us |
Sample ID Labels: |
Affix sample ID labels lengthwise |
Sample Info: |
Upload to project portal |
Culture: |
Grow your bacteria / fungi |
Transfer: |
4 x 10⁹ - 6 x 10⁹ cells or 30 - 50 mg |
Ship: |
Package and label correctly |
We will NOT be able to accept your samples if you have not entered the sample information in your project portal.
The full protocol available in PDF format has additional information, including a visual summary, a worked example on calculating optical density, and some tips and tricks to optical density measurements.
Overview
Preparing strains for submission to MicrobesNG is easy - we provide tubes containing a buffer, which inactivates the cells and stabilises the DNA. The buffer also effectively inactivates pathogens so you can send samples from around the world, hassle free.
- GMO’s and CL/BSL-3 strains accepted
- Ship at ambient temperature, through regular post
We do not grow your strains - instead, we extract DNA directly from the material that you send. For this reason, you need to send between 4 x 10⁹ to 6 x 10⁹ cells, or a pellet that weighs between 30 and 50 mg when wet.
This protocol will give you some pointers on how to:
- Grow a pure culture
- Quantify the number of cells
- Harvest the cells
- Ensure that the ratio of cells to buffer is correct so that all the cells are properly inactivated, and the DNA is stabilised
You can see a visual summary of the process in Appendix A of the PDF document.
Inactivation Buffer
The tubes that we send you contain 500 µL of DNA/RNA Shield from Zymo Research. This buffer effectively inactivates pathogens, including tough-to-lyse microbes, without the need for any additional steps. Samples are stable at 4-25˚C for >2 years, and indefinitely at -20˚C. If exposed to low temperatures, a precipitate may form. This can be resolved by warming the buffer to above 37°C and mixing gently. The buffer's functionality is not affected.
It is very important that the total volume of sample that you return to us does not exceed 550 µL. Using this ratio of 1 part cells to 10 parts buffer ensures that your organism is properly inactivated and safe for transport and handling. If you send too many cells, there will be incomplete inactivation, the DNA will not be properly stabilised, and we may not be able to accept your samples.
We ask you to read the Safety Data Sheet for DNA/RNA Shield, which can be accessed via the manufacturer’s website.
If you prefer to provide your own tubes, we require 2 mL screw cap tubes with an outer diameter of 11 mm, which is the standard diameter for microcentrifuge rotors. Tubes must contain 500 µL of DNA/RNA Shield, which can be purchased from Zymo, or one of their regional distributors. Your sample ID labels are listed in your project portal; note that we do not accept handwritten labels, so you will need to print the numbers and attach them to your tubes.
Sample Information
Before sending your samples, it’s vital that you submit your sample information in your online project portal. We need to know the species of the organisms you are sending to ensure we can meet our guarantees on coverage, and provide the best QC possible.
If you do not know the species, we can accept identification to genus level, however this may impact the QC of your sequencing data. If you don’t know the identity of your organism, then please contact us at info@microbesng.com.
We will not be able to accept your samples if you have not entered the sample information in your project portal.
Growing your cells
Here are a few steps to ensure your strain is pure and clonal. Purity is important for obtaining the highest quality assembly.
- Prepare an agar plate of the strain you wish to sequence.
- Visually inspect the plate to ensure there is a single phenotype.
- Pick a single colony and subculture either in liquid broth, or on an agar plate.
If you grow your cells in liquid broth, we recommend that you resuspend a single colony in 200 µL of a suitable sterile buffer (e.g. PBS), and use 100 μL as an inoculum. Following culture, we would recommend plating an aliquot of this fresh growth to ensure no contamination occurred during the process.
If you grow your cells on agar plates, aim to have a lawn covering between ½ to ⅔ of the plate, and streak the rest of the plate to obtain single colonies to check the culture is pure. Depending on the species you may need to prepare more than one plate.
Quantifying your cells using optical density
There are several ways of quantifying bacterial growth. This protocol uses Optical Density at 600 nm (OD600) and the calibration of OD to cell number is based on E.coli. If you are working with an organism which differs significantly in size or shape then you should either perform your own calibration (see Appendix C of the PDF document) or refer to the section on Quantifying your cells by weight. This OD method requires access to a spectrophotometer, and we recommend that you follow the instruction manual for your instrument to ensure you obtain accurate readings. If you’re new to OD, check out Appendix C.
If you subcultured your pure single colony into a liquid broth, you should aim to harvest cells during the mid log/exponential growth phase. This is typically between an OD600 of 0.5 - 1, depending on the organism you are culturing. Mix the culture thoroughly before measuring the optical density and blank using sterile broth.
If you grew your bacteria on an agar plate, create a bacterial suspension by harvesting ½ to ⅔ of total fresh growth from the plate with a sterile loop and resuspend it in 5 - 10 mL of a suitable sterile buffer (e.g. PBS). You can then blank the spectrophotometer with an aliquot of the sterile buffer, and measure the optical density of an aliquot of your bacterial suspension.
OD measures are only valid when they are below 1.0, so you may need to prepare a serial dilution of your bacterial suspension, with the series continuing until one of the dilutions has an OD below 1.0. You can then calculate the OD of the stock culture by multiplying the measured value by the dilution factor (Appendix C).
We require 4 x 10⁹ - 6 x 10⁹ cells - this ensures that the cells are inactivated and safe for transport and handling. This number of cells would represent an equivalent OD1 of ~10 (using 5x10⁸ cells/ml being equivalent to an OD of 1). As mentioned previously, equivalence between OD and cell concentration can differ between organisms.
For example, if you’re harvesting a liquid culture at an OD600 of 0.8, you would need to process 10 - 15 mL. If the stock bacterial suspension you prepared from an agar plate has an OD600 of 80, you would need 0.10 - 0.15 mL. A worked example is provided in Appendix B of the PDF document.
Quantifying your cells by weight
If OD is not a good fit for your organism, you can centrifuge your cells and send us a pellet that weighs between 30 and 50 mg when wet. Alternatively, you might consider plate counts of serial dilutions (e.g. Miles & Misra) or flow cytometry to quantify your cells.
If you are sending filamentous fungi please make sure your cell pellet is made up of several small Hyphal pellets and NOT one large one.
Harvesting cells
Now that you have quantified your cells you should wash them. Take an appropriate volume and centrifuge, to pellet the cells. Discard the supernatant, and wash the pellet with 1 mL of sterile buffer (e.g. PBS), before centrifuging a second time. Ensure all the supernatant has been removed and the cell pellet is as dry as possible.
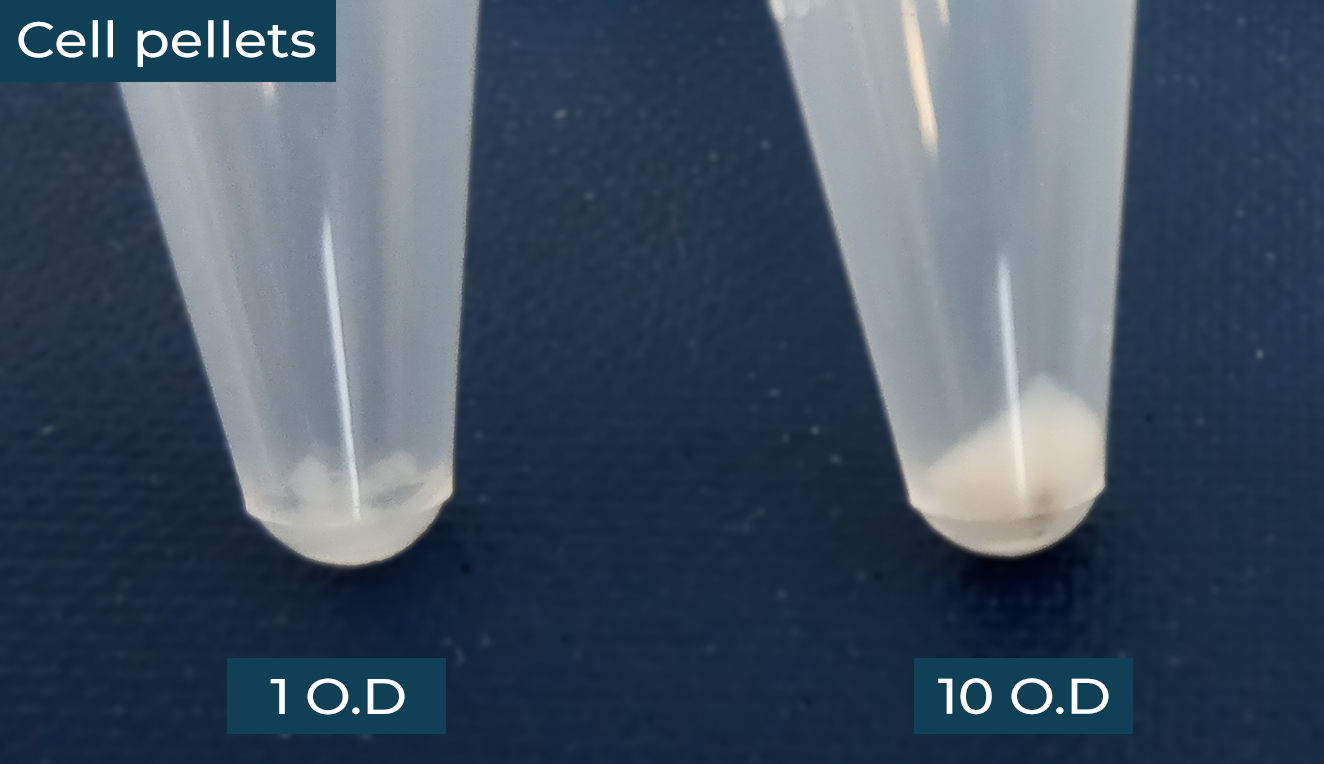 Figure 1. Pelleted S. aureus cells; the right tube contains cells at an equivalent OD600 of 10, or ~40 mg in wet weight. The pellet on the left shows an example of equivalent OD600 of 1, which is insufficient for submission.
Take 500 µL of the inactivation buffer from the sample tubes provided to you, and use it to gently resuspend the pellet. You should have a maximum of 550 uL of liquid in your tube.
Transfer this resuspension back into the sample tube that we provided, ensure the lid is tightly fastened, and affix the MicrobesNG Sample ID label that we sent with your tubes.
Please attach labels to your sample tubes lengthwise, not around the tube (Figure 2).
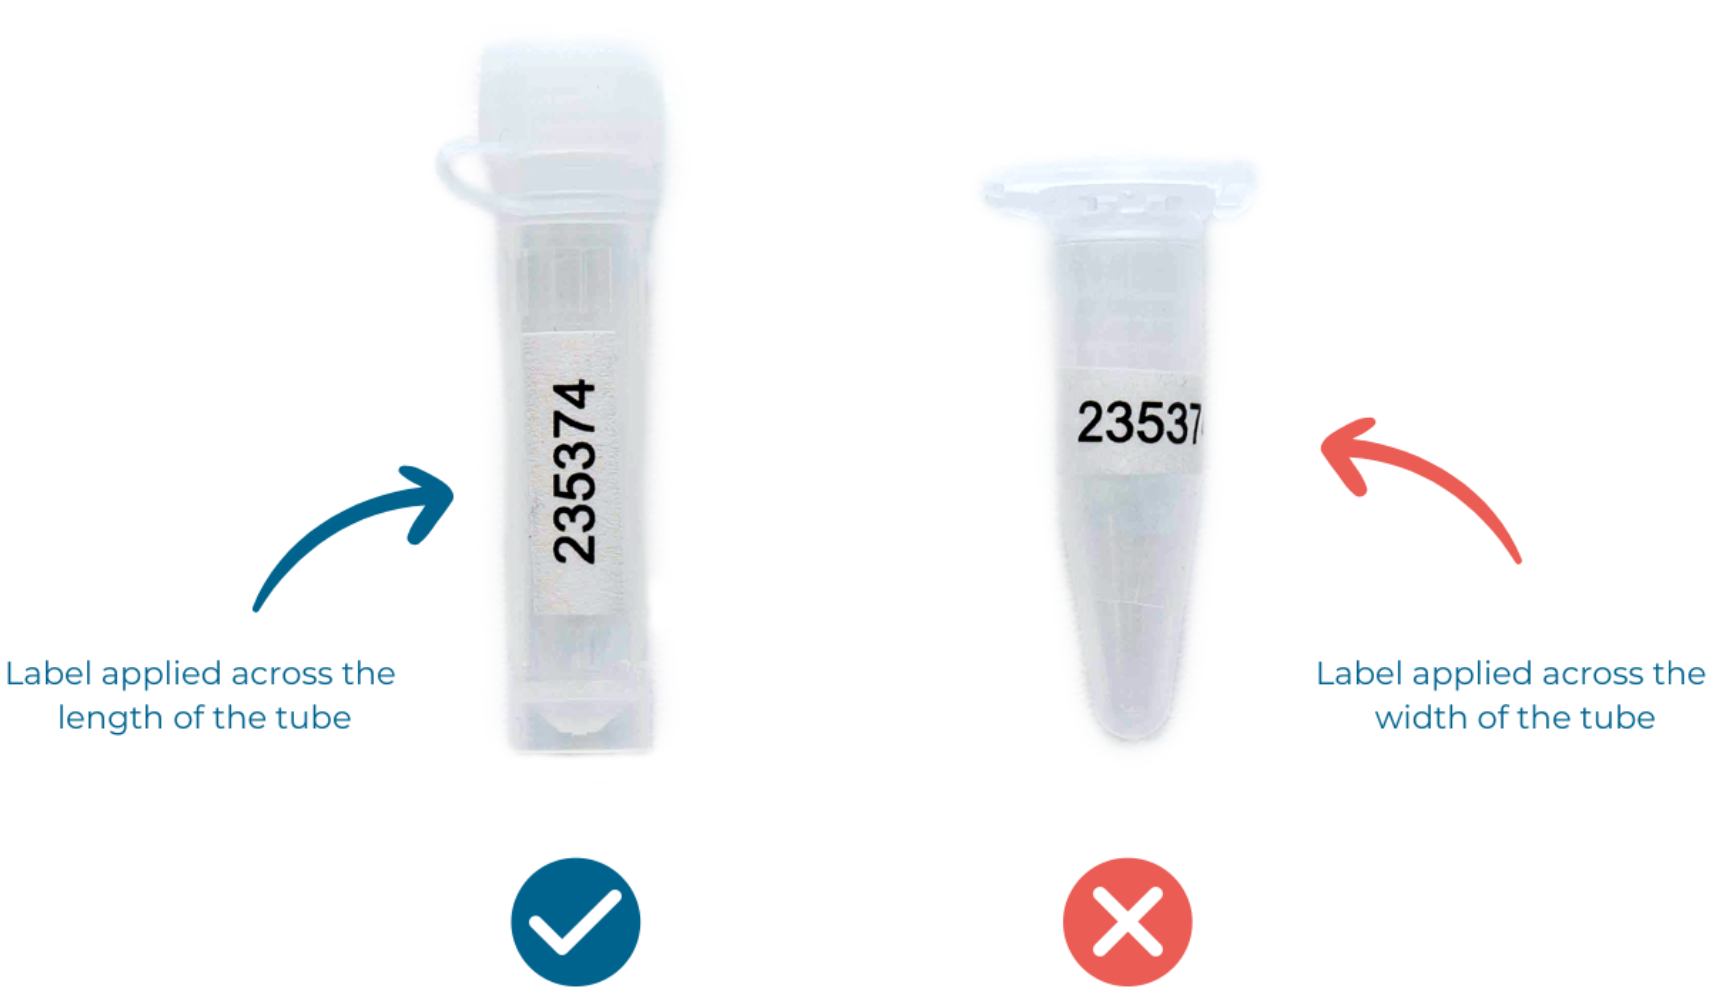 Figure 2. How to correctly apply labels to your tubes. Please use the tubes we provide, or if supplying your own, ensure they are 2 mL thread capped tubes containing 500 µL of DNA/RNA Shield Inactivation Buffer.
We will not be able to accept your samples if you use incorrect tubes or labelling, or if you have not entered the sample information in your project portal.
Shipping
If you expect your shipment to arrive within 5-7 days, the samples can be sent at ambient temperature. If your package will be in transit for longer than this, we recommend including ice packs.
To prevent your samples from leaking during shipment, place the tubes in a rigid tube box, with individual spacers. Placing your tubes in the box in order of the sample ID number greatly reduces handling, and will give you the best possible turnaround time.
If we sent your buffer tubes in a plastic box, please use this to ship your samples to us. If you are sending more than one project in the same shipment, please use a separate box for each project and clearly label each box with the project number (e.g. 20250318_Cottier1). If you are not able to use a box, please separate tubes from different projects in another way, e.g. inside a falcon tube or zip lock bag.
Place the rigid tube box inside an outer package (e.g. polystyrene or cardboard box) along with some absorbent material to catch any leaks, and protect it with suitable packaging material.
Log onto your project portal to print the return label and attach it to the outside of your package. Using this label will help our Laboratory Team to identify your project and ensure your samples enter the correct pipeline as quickly as possible. We recommend that you send your parcel using a tracked service. For more information please access our detailed shipping guide.
Make sure that you have entered the sample information in your project portal before shipping your samples! We use this information to optimise the extraction process and we will NOT be able to accept your samples without it.