DNA Plate Requirements
For larger projects, we’ll ask for you to send your DNA samples in plates. Do not send a plate unless we have asked you to.
The following checklist can be used as a quick reference to ensure your DNA plate meets our submission criteria.
Plates that do not meet one or more of the criteria below can be refused, or fail to sequence entirely, so please ensure you read the entire document to avoid any issues or delays.
Volume: |
30 - 80 µL | |
Concentration: |
1* - 30 ng/µL | |
Buffer: |
Does not contain EDTA | |
Integrity: |
Is not degraded | |
Plate: |
Skirted U/V Wells | |
Sample ID Label: |
PRINTED label applied to tube | |
Sample Info: |
Uploaded to Project Portal |
* ≥10 ng/µL if measured with spectrophotometer (e.g. NanoDrop)
We will NOT be able to accept your samples if you have not entered the sample information in your project portal.
Volume
We require a sample volume of 30 - 80 µL of DNA in an EDTA-free buffer.
Concentration
We require your DNA to be at a concentration of 1 - 30 ng/µL*.
DNA samples must be quantified before sending them to us, and the concentration recorded in the sample sheet on your project portal. Please normalise your samples to the same concentration, this will speed up your turnaround time.
We strongly recommend the use of a fluorometric quantification method that is specific to DNA (e.g. Qubit, Quantus, Quant-iT, Picogreen).
*If you do not have access to a fluorometric platform, you can use a spectrophotometric platform (e.g. NanoDrop) to quantify your DNA. However be aware that this modality often overestimates DNA concentration. Therefore, the minimum required concentration measured using a spectrophotometer is 10 ng/µL.
Buffer
The best buffer to elute your DNA in is EB (10 mM Tris-HCl pH 8.5).
You can elute your DNA using ultrapure, nuclease-free water - in this case please ensure you store samples at -25°C to -15°C to prevent degradation.
We cannot accept DNA that is eluted in a buffer containing EDTA (e.g. TE buffer), as EDTA binds to bivalent cations (e.g. Mg2+) that are essential for enzymatic reactions in the library preparation process.
Integrity
You must check the integrity of at least 1 sample per plate row (i.e. at least 1 in 8 samples) for whole genome sequencing projects, and every sample for metagenomics projects. This is important as overly fragmented samples will fail to sequence properly.
It is compulsory to submit proof of integrity of your DNA samples before you send them by emailing info@microbesng.com. A member of our lab team will verify that your samples meet our submission requirements, and approve your plate for submission. If you do not submit proof of integrity, you will be given the option for us to accept your samples onto our sequencing pipeline, but we will not resequence any samples that fail due to sample integrity issues.
To check integrity, run your samples on an electrophoresis system like the Bioanalyzer HS DNA chip or Tapestation gDNA Screentape. Alternatively, you can perform gel electrophoresis with a 0.75% e-gel/agarose gel with a 1kb ladder.
An example of intact and degraded DNA is provided in Figure 1 below; non-degraded genomic DNA (Samples 1 + 2) will show a single band of High Molecular Weight (>40,000 bp). A smear between 100 - 40,000 bp indicates DNA degradation (Samples 3 + 4), which may jeopardise the success of our NGS library preparation.
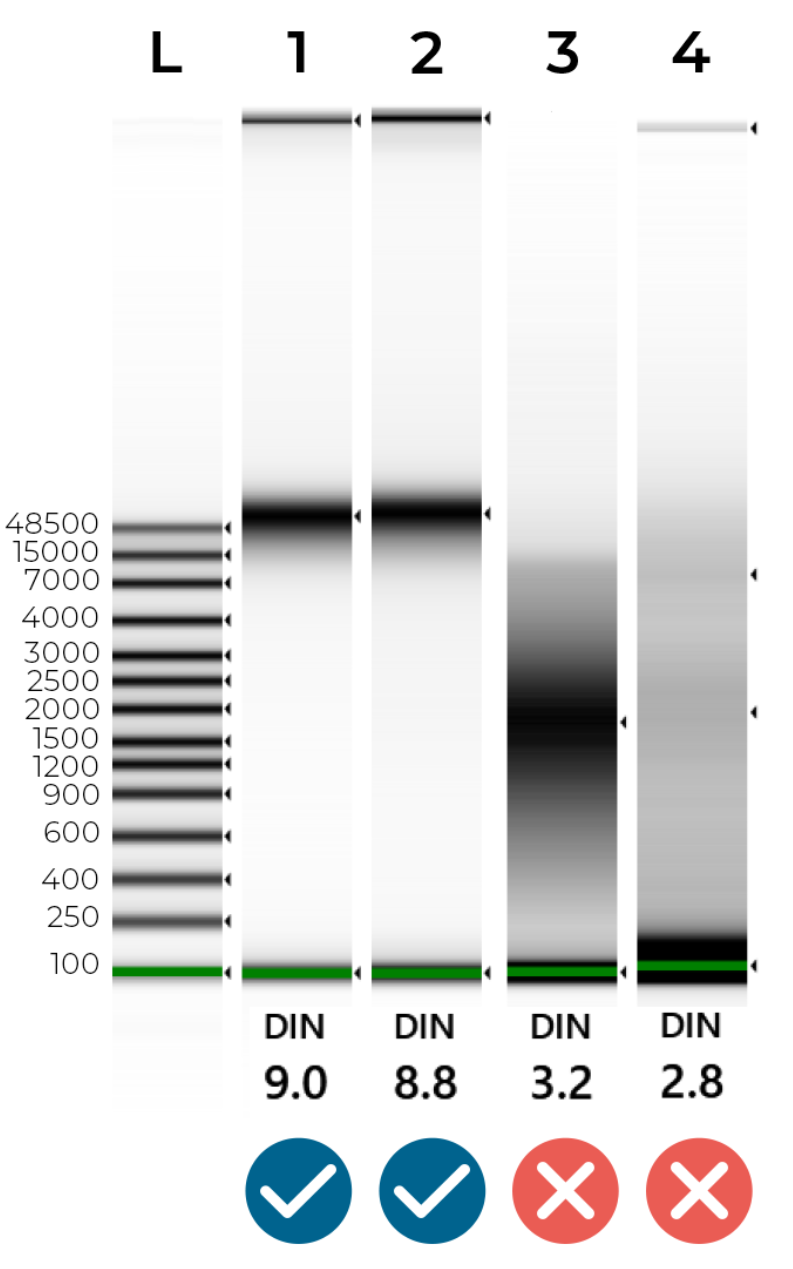 Figure 1 - Genomic Screentape results of intact and degraded DNA samples. The DIN (DNA Integrity Number) summarises DNA quality. Ideally, samples should have a DIN of 7.0-10.0. Samples are likely to fail sequencing if their DIN is lower than 6.0.
For plate submissions this is a compulsory requirement
We must see your Bioanalyzer / Tapestation / Gel results and confirm to you that they are OK before you ship your samples to us. Please email this to info@microbesng.com.
This is a compulsory requirement because overly fragmented samples will fail to sequence properly. We want to ensure you get the results you have paid for and avoid any disappointment.
Sample Info
It’s really important that you fill in the metadata for your samples on the project portal before you post them. We use this information to optimise our library preparation, so we can not accept your samples without it.
If we do not have this information when your samples arrive in our lab, they will be placed on hold whilst we contact you, which could lead to a longer turnaround time.
If you are not sure what your organism is to at least the genus level, then please contact us at info@microbesng.com and let us know, this will make sure that your samples are processed as quickly as possible. This is not a requirement for metagenomics projects.
Preparing your plate
Please note that we only accept samples provided in skirted PCR plates; we do not accept cell culture plates or unskirted PCR plates, as they are incompatible with our workflow.
Load your samples in the plate by columns (NOT by rows) starting in well A1 (Figure 2). Only use the well locations that appear in your project web portal (samples received in wells not included in the project web portal will NOT be processed).
Check the integrity of at least 1 sample per row, this is important as overly fragmented samples will fail to sequence properly. Send your Bioanalyzer / Tapestation / Gel image to info@microbesng.com, with the subject ‘DNA integrity check’ and we will be happy to advise you.
Seal the plate with a heat-sealing clear seal (or foil if you don’t have clear seals). You can also use strip lids, just make sure they are compatible with your specific PCR plate type. We recommend that you test the seal using a dummy plate to make sure there are no leaks, before loading your samples. You can use a PCR plate seal, incubated in a thermocycler for 10 minutes at 20˚C with the heated lid set to 105-110˚C.
Finally, type and print your allocated plate ID number (e.g. 234567), and stick it to the front skirted edge of the plate (long side by row H, Figure 2). If you don’t have a label printer, please use normal paper and print and attach the label to the plate with transparent tape (e.g. Sellotape).
Enter your sample information in your project portal.
Please do not hand write the plate ID number on your plate. Handwritten labels can rub off, or be hard to interpret, so we do not accept plates with handwritten labels.
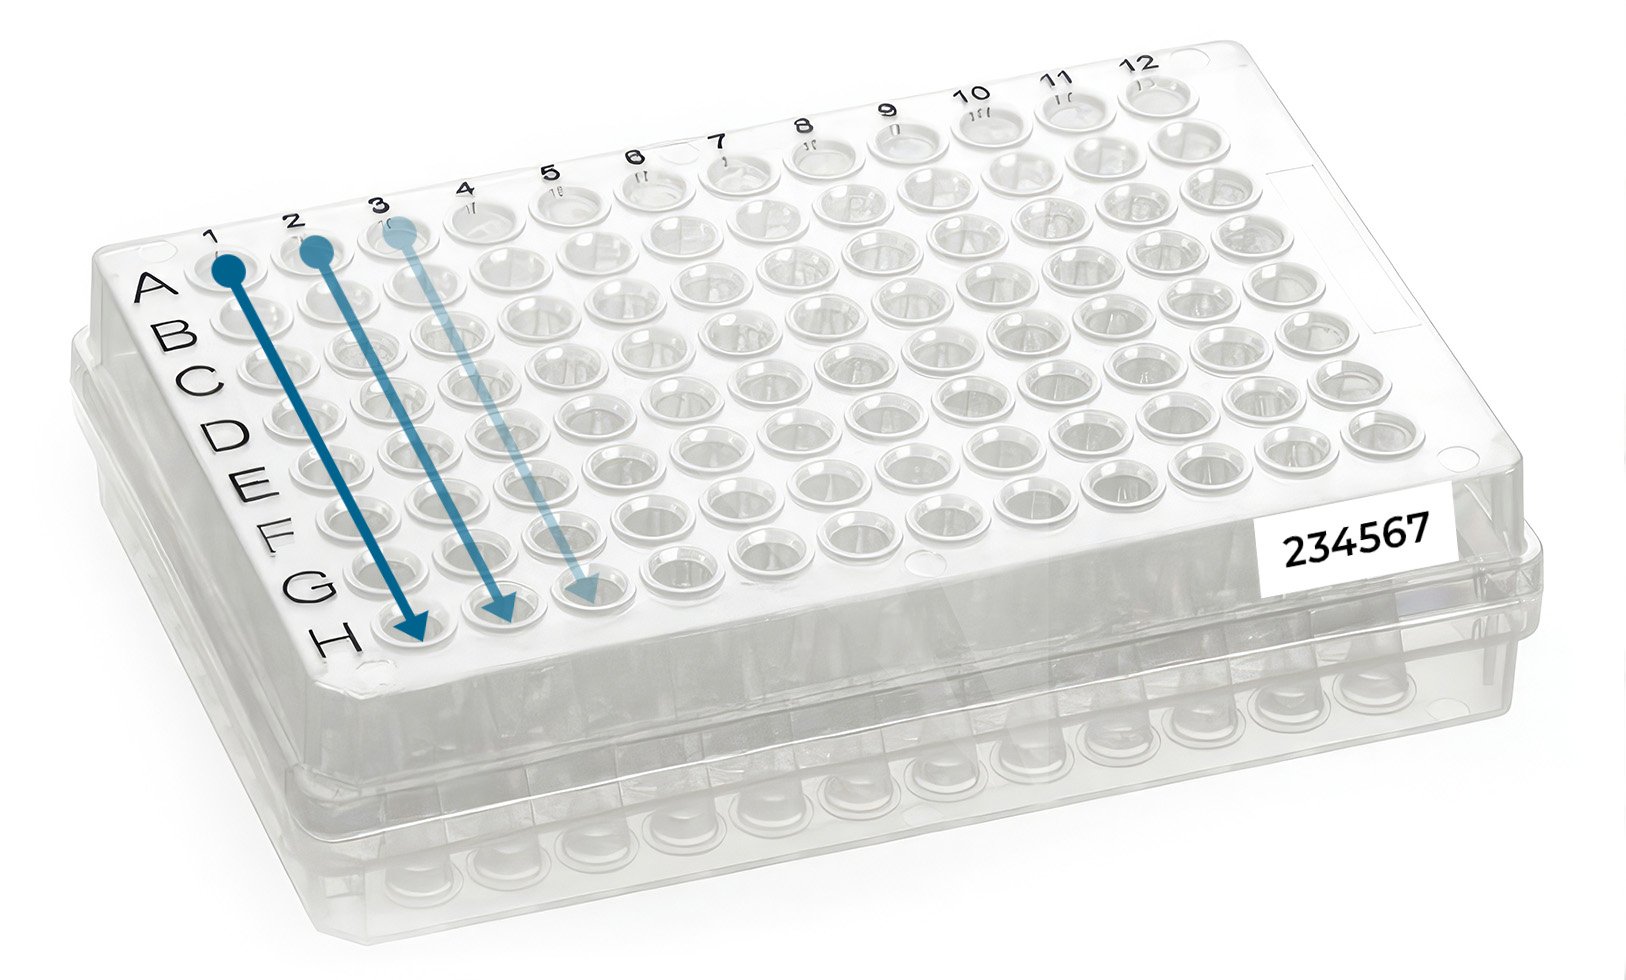 Figure 2 - How to load your samples in a 96-well skirted PCR plate.
Checking your plate seal integrity
We recommend that you test your seal in a duplicate plate with mock samples, using colorant (e.g. food-dye, safranin) in some samples and no colorant in others. Seal the plate as described above and shake the plate to make sure that no coloured liquid goes into the non-colorant wells. Remember, if you are sending the plate in dry ice please make sure that the seal you use can resist the low temperature without losing the adherence.
Shipping
We recommend shipping your DNA at ~4˚C by including freezer packs or wet ice. For shipments that will arrive within 1-2 days, you can ship your DNA under ambient conditions.
To protect your samples from breakages and leaks, place them inside a rigid tube box, and place that box inside a rigid outer package (e.g. polystyrene or cardboard package).
For more information, see our Sending your samples guide.